Software Trending News – Guaripete | Online Store |
- Does the DJI Osmo Pocket work with the iPad?
- How to restore your iPhone or iPad from a backup
- 10 Years of Samsung Galaxy S Phones: Which Stands Out the Most?
- RIP: LG G5 and LG V20 Updates Ceased
- T-Mobile Introduces “Caller Verified” Service for Better Spam, Spoof Call Protection
- T-Mobile rolls out Caller Verified spam call protection, starting with the Galaxy Note9
- BLU launches Android 9 Pie beta program for the Vivo XI+
- Whoops: Sony blocking Kodi on its Android TVs was an accident
- And Then They Were Gone: GNOME Reverts Back to Brown for Folder Icons
- Help Pick a New Logo for Fedora
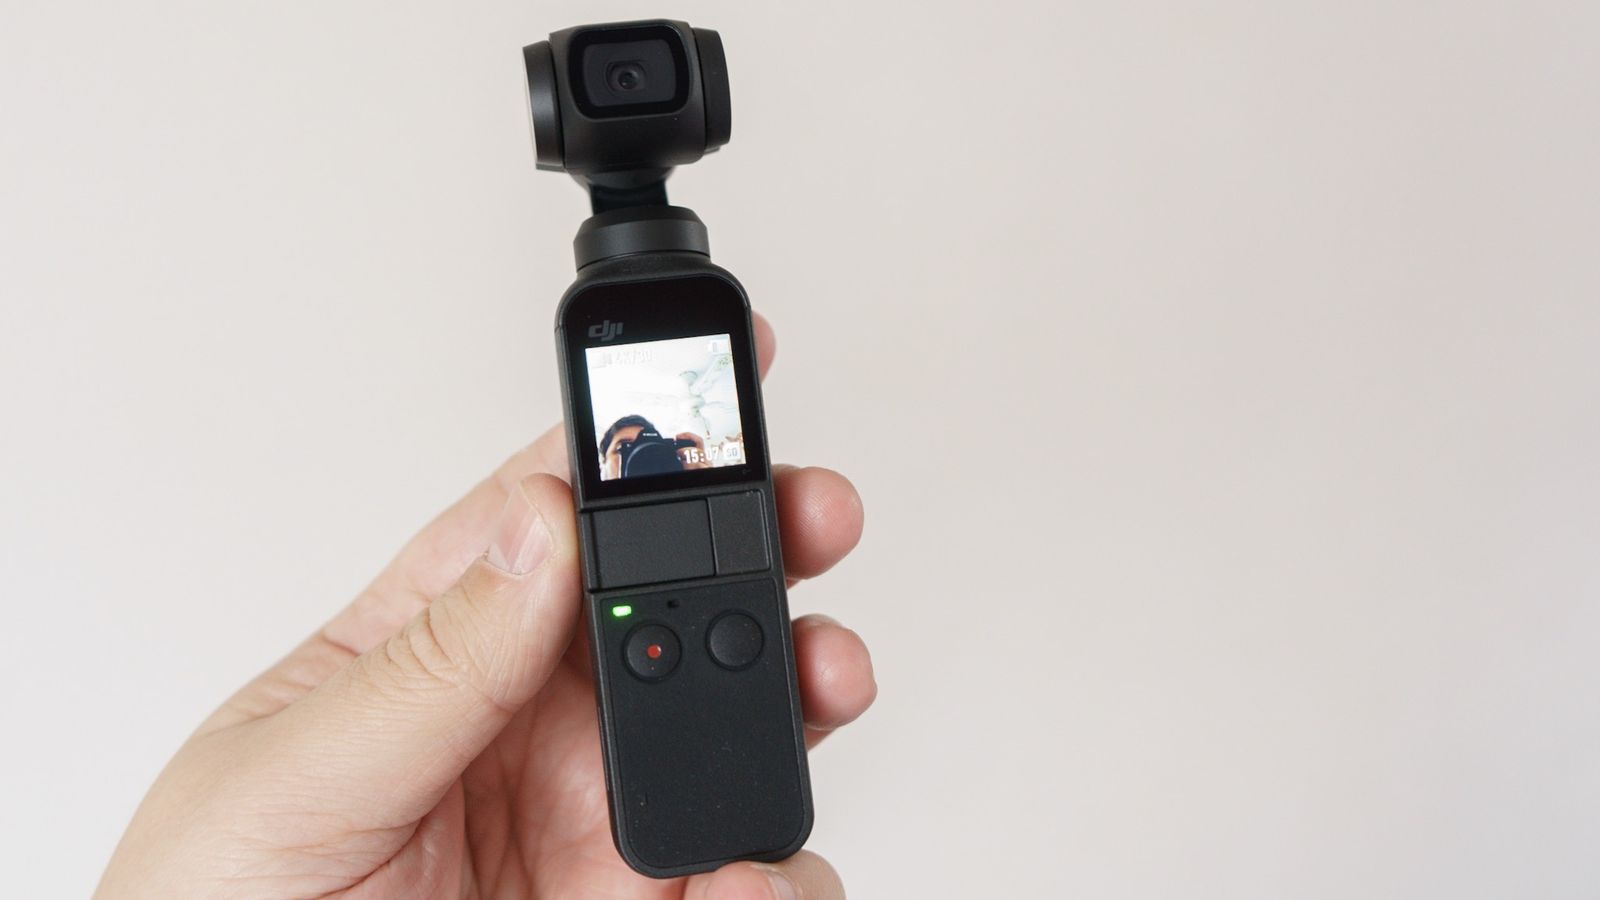
| Does the DJI Osmo Pocket work with the iPad? Posted: 10 Jan 2019 12:05 PM PST
Best answer: It’s not an ideal setup, but the Osmo Pocket and the DJI Mimo companion application do both work with the iPad, though a cable connection or buying the wireless module is your best option. Supports both Lightning and USB-C connectionsOut of the box, the DJI Osmo Pocket handheld camera supports devices with either a Lightning connector or a USB-C connector. DJI includes a connector for each in the box to hook up to the pogo pins on the Osmo Pocket, so you can use your smartphone connected directly to it and operate with the DJI Mimo app. The same can also be said of the iPad and the new USB-C toting iPad Pro, although it would be pretty awkward and not really recommended, since the connector on the Osmo Pocket is not designed to hold the weight of a tablet. But natively you can connect both Lightning and USB-C iPads directly to it. Probably best to use a cableThe pogo pins aren’t the only connector on the Osmo Pocket. The device charges over USB-C through the port on its base and port can also be used for output to a phone or tablet. You will get the same exact experience with the Mimo companion app as you would hook up to the included connector. You don’t get any cables in the box for this, so if you want to hook up your iPad you’ll need the right cable. For the majority of folks who will be using an iPad with a Lightning connector, Apple’s USB-C to Lightning cable is an easy suggestion. Pop this into the Osmo Pocket and connect your iPad with your regular USB-A to Lightning cable. Going wireless
Using a cable is the cheapest way to connect to your iPad, but if you’d rather be wireless, perhaps to operate your Osmo Pocket from further away, DJI’s brand new Wireless Module is what you need. Not only does it act as a sturdy base for the Osmo Pocket and allow you to charge it, but it will also allow you to connect to it from the Mimo app over a wireless connection using Bluetooth and Wi-Fi. DJI Mimo isn’t optimized for iPadUnlike DJI’s drone apps, the new Mimo app for the Osmo Pocket isn’t currently optimized for the iPad. The app runs just fine but it doesn’t scale to fit the iPad screen. It’s a sub-optimal experience but it does work, so you can connect your iPad if you want to. For some people, using an iPad is preferable purely for the larger screen. Framing is easier, as is navigating the menu system. You must use the Mimo app to access the full feature set of the Osmo Pocket, including taking panoramic photos and motion lapse videos. Works just fine
DJI Osmo PocketA game-changing product for mobile photography The Osmo Pocket is no more cumbersome than a smartphone with the added bonus of proper 3-axis stabilization. No phone will produce footage this smooth. One cable
Apple USB-C to Lightning cableOne single cable to connect your Osmo Pocket and your iPad A USB-C to Lightning cable is a great accessory to tuck away in your gear bag to use with your Osmo Pocket and your iPad. No adapters needed! Wire free
DJI Osmo Pocket Wireless ModuleOperate your Osmo Pocket completely wire-free The Wireless Module allows you to operate your Osmo Pocket remotely with your smartphone or tablet using Bluetooth and Wi-Fi. This post may contain affiliate links. See our disclosure policy for more details.  The post Does the DJI Osmo Pocket work with the iPad? appeared first on GuaripeteMagazine. |
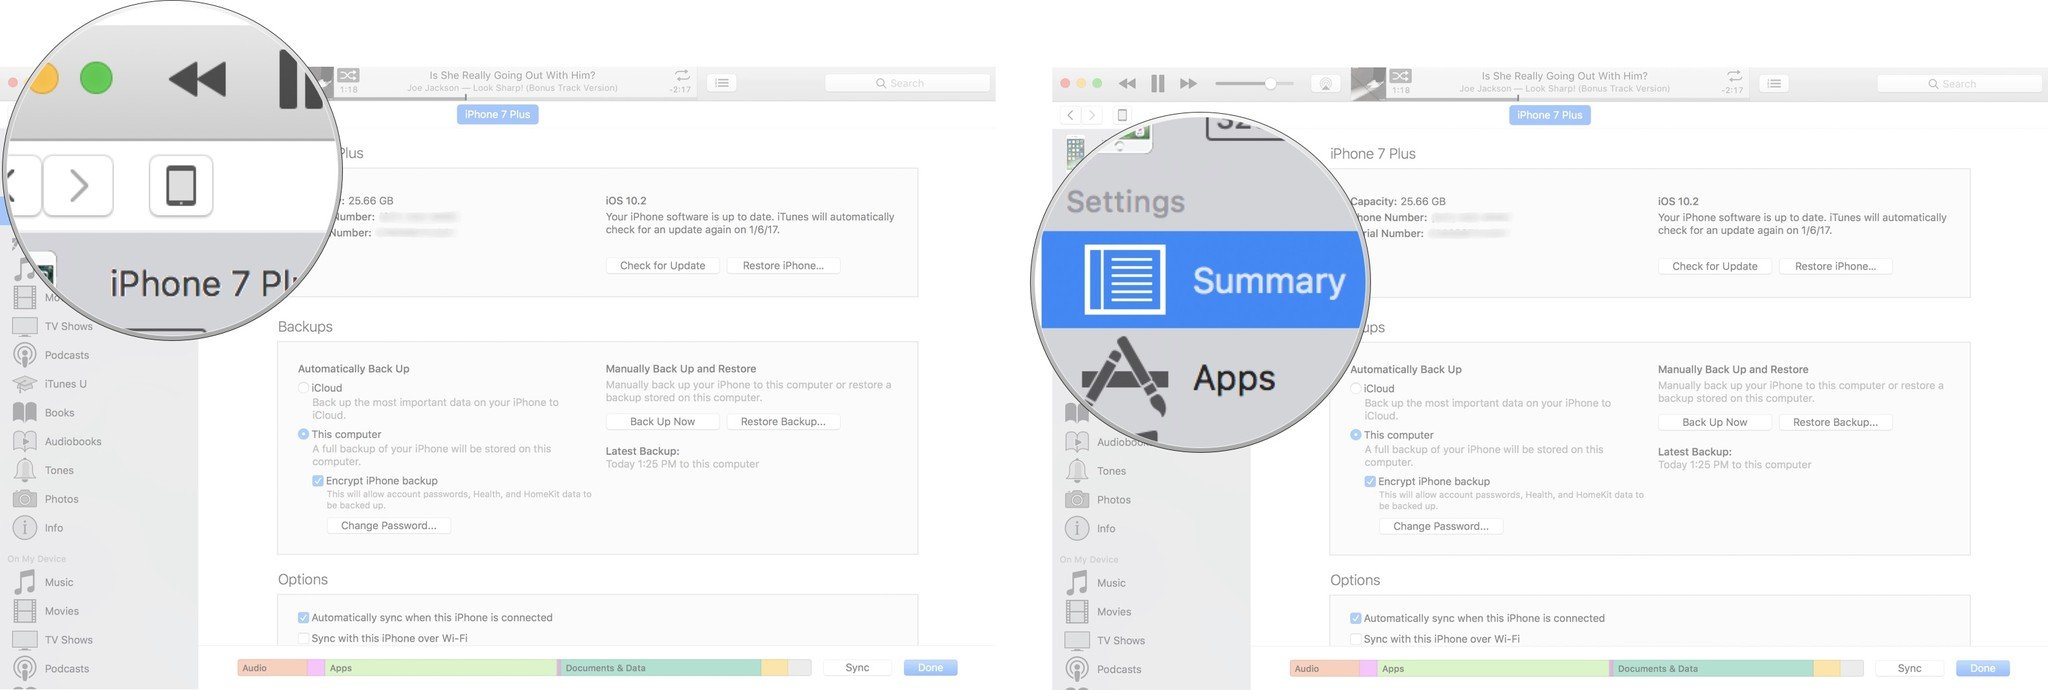
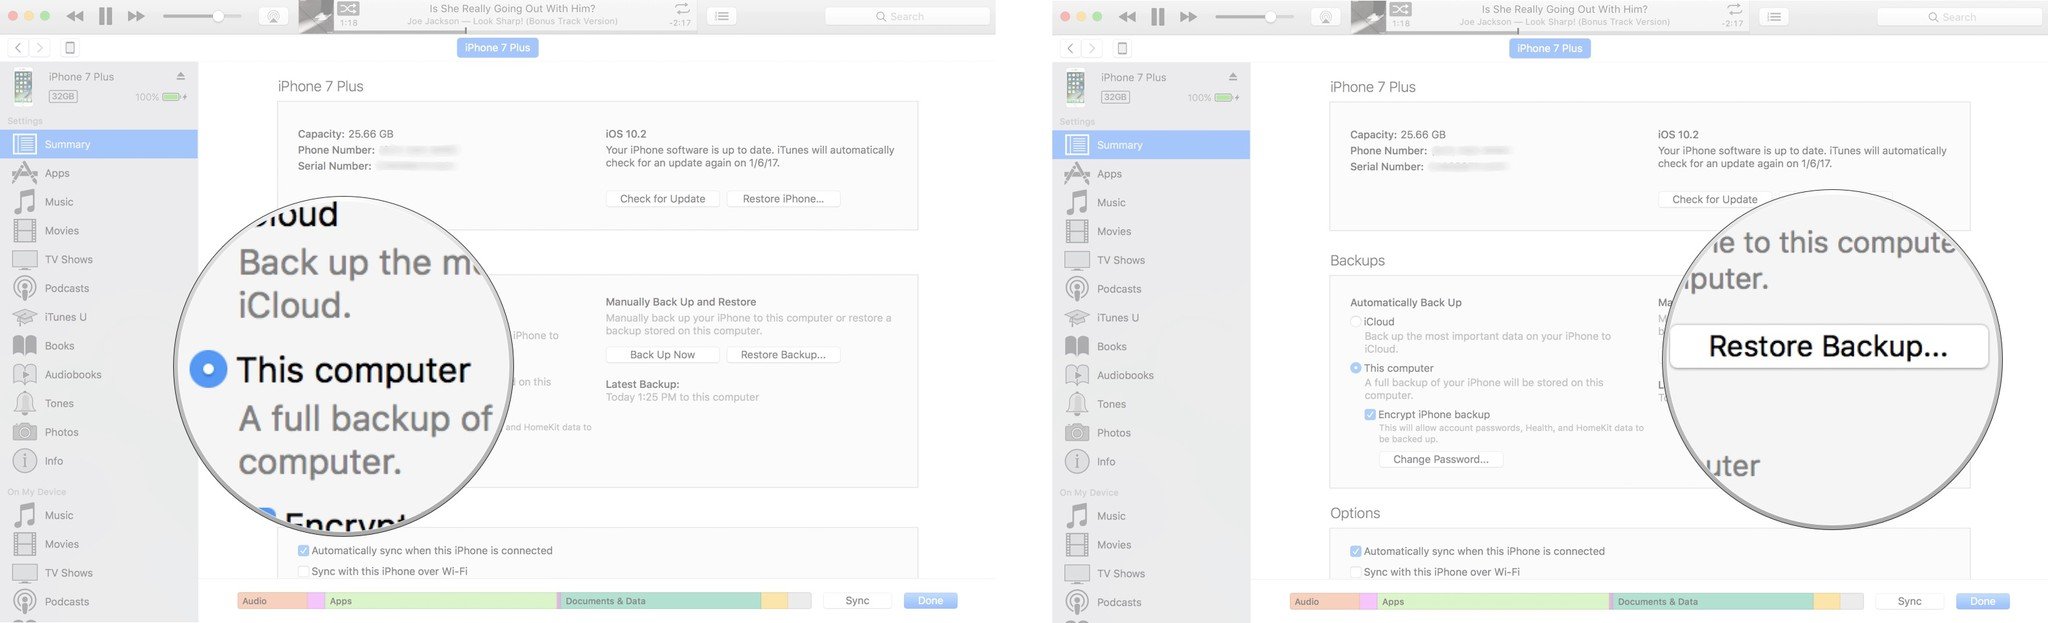
| How to restore your iPhone or iPad from a backup Posted: 10 Jan 2019 12:04 PM PST The iPhone and iPad are not infallible. Sometimes, things happen. Your Wi-fi or LTE connection isn’t working; your iPhone isn’t tracking your location, things are just generally glitchy. If your iPhone or iPad is acting up, you can restore it from a backup to get it back on track again. Step 1: Always be backing upJust like it is important to back up your Mac, it is essential to make sure your iPhone or iPad is on a regular backup schedule. You can set it up to automatically back up every 24 hours via iCloud, or whenever you connect it to your computer and open iTunes. Your backup regimen is up to you, but you should be backing up regularly so when you have to resort to restoring your device, you’ve got a backup ready. Burn it down. Burn it all down! Or: how to reset your deviceThe first thing you will need to do to restore your iPhone or iPad from a backup is to erase and reset all of your content and settings. At this point, you will lose all data that hasn’t been synced in iCloud or another cloud-based service. Here’s a list of data you will keep and lose when you reset your iPhone. Find My iPhone will also automatically be disabled when you reset your device. Not to worry, though. It will automatically enable when you restore. Once you are sure you’ve backed up everything important, erase your iPhone data right from the device. How to restore your iPhone or iPad using iCloudNext, you’ll need to restore your iPhone’s data from its most recent backup. Once you’ve reset it, follow these steps.
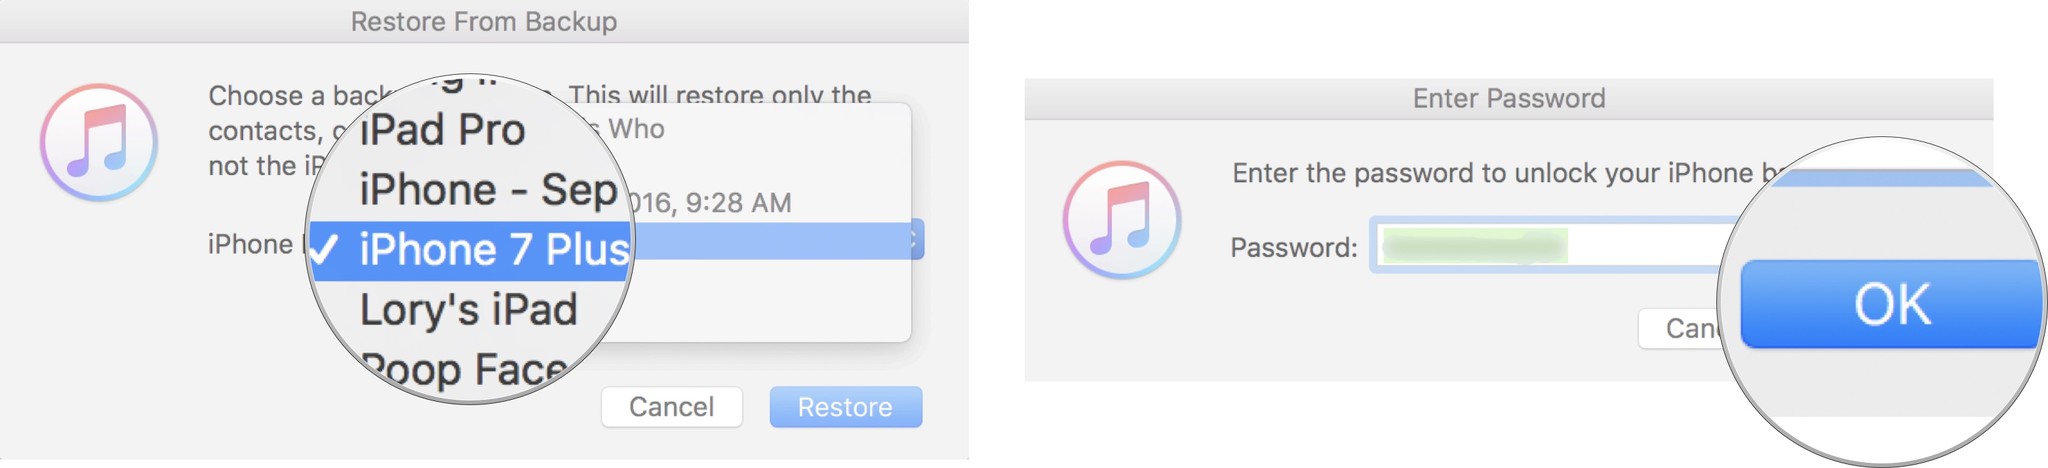
It will take a while to restore your backup from iCloud, so grab a cup of tea and go for a nice, healthy walk. How to restore your iPhone or iPad using iTunesIf you choose to back up your iPhone or iPad by connecting it to iTunes and storing the backups on your computer, you can also restore it from your most recent iTunes backup. You’ll first need to manually disable Find My iPhone. Then, you can use iTunes to restore from a backup. Note: This method restores your iPhone’s contacts, calendars, notes, text messages, and settings, but not the firmware.
When all else failsIf for some reason, restoring from a backup does nothing to help your problem, you can start fresh with a clean install of iOS on your device. The benefit of doing this is that it empties your iPhone of everything and resets it as if it were brand new, which means you can start over and only select apps you want to keep on your iPhone or iPad. It’s sort of like spring cleaning your device. The bad news is that it does not save your Health data or Messages. Before doing a clean install, make sure your photos, app data, music, safari activities, and contacts have been backed up to some cloud services, like iCloud Drive, Dropbox, or OneDrive. This data will not carry over, but can be added back to your iPhone if you’ve saved it in the Cloud. As for saving your Health app data or Messages, you can use a third-party app like Health Data Importer for exporting and importing Health app backups. Once you’re sure you’ve backed up important data in some cloud service, you can perform a fresh install of iOS on your iPhone or iPad. Follow the steps to reset your device, and then select Set Up as New Phone. Any questions?Do you have any questions about restoring your iPhone or iPad from an iCloud or iTunes backup? Let me know in the comments, and I’ll help you out. Updated January 2019: All information in this article is up to date for iOS 12 and macOS Mojave. The post How to restore your iPhone or iPad from a backup appeared first on GuaripeteMagazine. |
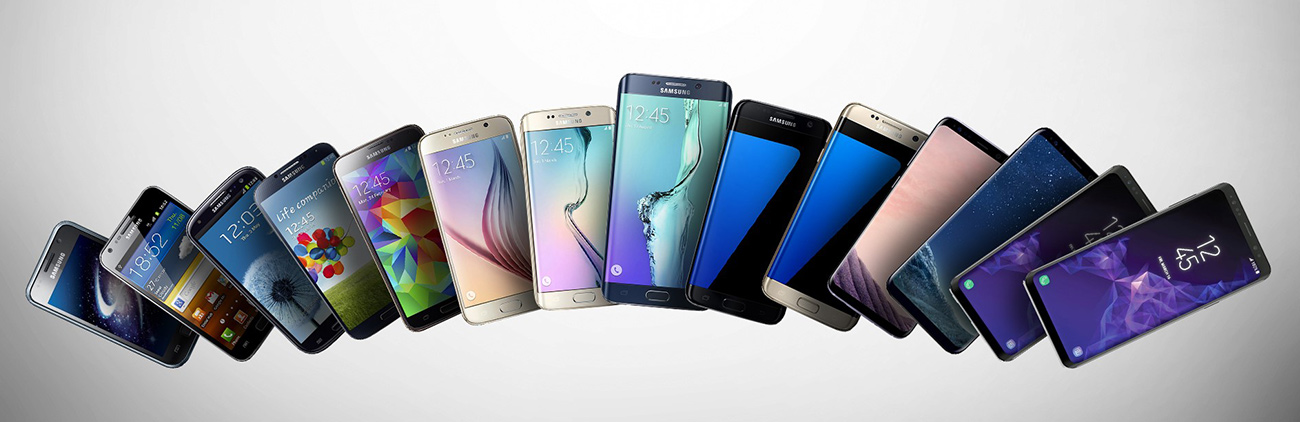
| 10 Years of Samsung Galaxy S Phones: Which Stands Out the Most? Posted: 10 Jan 2019 12:04 PM PST  Now that we have a date set for the Samsung Galaxy S10 to arrive, Samsung has started celebrating 10 years of their popular flagship phone series. A post to their press site shared some of their own thoughts on the history up until now, but I'm more curious about your views of the Galaxy S line. Is there a particular release that stands out the most? For me, it's probably the Galaxy S6 (review) line, even if the many versions of it had some serious flaws (no SD, water resistance, or removable battery, plus horrible battery life). I think the Galaxy S6 brought big change for Samsung, where they became a premium phone maker after being laughed at by the industry for continuing to produce plastic trash for so long. Remember, the Galaxy S5, released the year before the S6, was a disaster of a phone in terms of design and materials. Not only was it it full plastic, Samsung embarrassingly painted plastic to look like metal and the design often invoked jokes because of its band-aid aesthetic. They also included a USB port flap to help it stay water resistant. The phone had a f*cking flap. But with the Galaxy S6, Samsung was new again. The Galaxy S6 had a metal frame, glass all over, and was certifiably gorgeous. The S6 also brought with it the era of curved displays, moving them beyond just a one-sided gimmick. While I'm no longer a fan of the dual-curved edges, there is no denying that they are a thing of beauty and that the industry has followed Samsung's lead there some. Since the release of the Galaxy S6 and S6 Edge, we have had three additional Galaxy S releases, all of which look like evolved S6s. As Samsung transitioned from Galaxy S to S2 to S3, S4, and S5, it often felt like Samsung was either trying all sorts of different design ideas when they were copying Apple. For the past four years, the design language has been established. You know a Samsung phone when you see it and that all started with the S6.
IMAGE: SAMSUNGAs we await the arrival of the Galaxy S10, the most recent leaks show a phone that will undoubtedly still resemble the Galaxy S6. Sure, it'll show major improvement, but you'll know exactly what it is the minute you see it. So tell us – which is the Samsung Galaxy S phone that stands out the most to you? The post 10 Years of Samsung Galaxy S Phones: Which Stands Out the Most? appeared first on GuaripeteMagazine. |
| RIP: LG G5 and LG V20 Updates Ceased Posted: 10 Jan 2019 12:04 PM PST  According to information discovered on LG's own security bulletin webpage, we've reach end of life for the LG G5 and and LG V20. We can't say we're shocked, but considering neither device has been updated to Pie, we and the owners of these phones are surely a little disappointed. Looking back at the update history for both phones, neither device received glowing support from LG, but they were updated to Oreo in late September, 2018. Just thinking about that timing, Pie was released by Google in August, with plenty of developer previews before that. It's not like LG didn't have time to ensure these near-death devices were running the latest Google software before ceasing support, but that's the outcome we've reached. With this information now known, it appears the G5 will not be updated past September's security patch on Oreo and the V20 won't receive anything past November's patch on Oreo. This feels like a good time to remind you that LG has an entire building dedicated to software updates that doesn't appear to do anything of the sort. The post RIP: LG G5 and LG V20 Updates Ceased appeared first on GuaripeteMagazine. |
| T-Mobile Introduces “Caller Verified” Service for Better Spam, Spoof Call Protection Posted: 10 Jan 2019 12:04 PM PST  Illegal caller ID spoofing is a big problem right now in the spam call space, so big that the FCC has demanded wireless carriers take action. One of the first to do so is T-Mobile, who just introduced "Caller Verified," a service they hope will help customers avoid spoof and spam calling. Caller Verified informs customers on the call screen whether or not the incoming call has been verified to be authentic and not intercepted by scammers or spammers. It's not a call blocker, though, in case you were wondering. Instead, it aims to inform you of the type of call coming through and whether or not you should answer it. The service implements STIR (Secure Telephony Identity Revisited) and SHAKEN (Secure Handling of Asserted information using toKENs) standards, which the industry developed for this purpose and has been promoted by the FCC for use right away. The basics of it are that every call that comes through a carrier to your phone should have a certificate of authenticity attached. To start, a software update will push to the Samsung Galaxy Note 9 with Call Verified attached. Throughout 2019, additional phones will gain support. Call Verified is free for T-Mobile customers. // T-Mobile The post T-Mobile Introduces "Caller Verified" Service for Better Spam, Spoof Call Protection appeared first on GuaripeteMagazine. |
| T-Mobile rolls out Caller Verified spam call protection, starting with the Galaxy Note9 Posted: 10 Jan 2019 12:04 PM PST
To say that spam calls are annoying would not only be redundant, but it’d also be a big understatement. These nuisances are primarily why I hardly answer my phone anymore and they’ve only gotten worse in recent months and years. T-Mobile is taking a stand against it by implementing what it calls Caller Verified technology, starting with the Samsung Galaxy Note9. Once Note9 owners get the update, any calls on the T-Mobile network that they receive will show a “Caller verified” message on the incoming call screen, assuming that Tmo itself has authenticated the call as legitimate and not hijacked. It all works based on the FCC standards of STIR (Secure Telephony Identity Revisited) and SHAKEN (Secure Handling of Asserted information using toKENs) — T-Mobile proudly states that it is the first carrier to implement these. Once Verizon, AT&T, and Sprint adopt STIR/SHAKEN, Caller Verified will work across networks. While I’m hopeful about the prospect of this, I’ll have to see its real-life efficacy for myself. Note9 owners should be getting the update that enables this soon, with other phones to get it later this year. The post T-Mobile rolls out Caller Verified spam call protection, starting with the Galaxy Note9 appeared first on GuaripeteMagazine. |
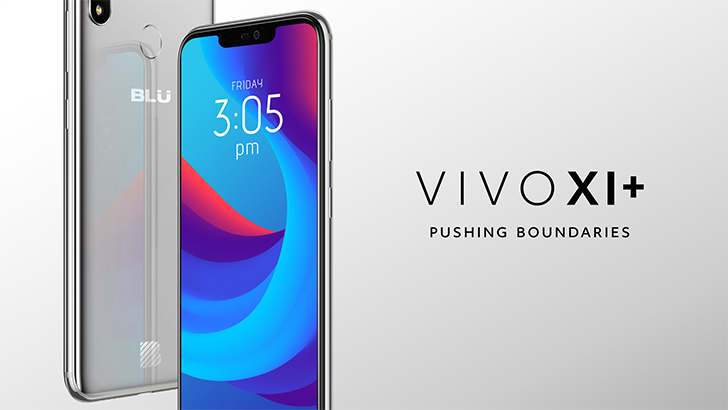
| BLU launches Android 9 Pie beta program for the Vivo XI+ Posted: 10 Jan 2019 12:04 PM PST
My, my, color me surprised. Looks like Blu, the notorious “manufacturer” of budget Android phones in the U.S., is keeping to its word. Back in August, the company claimed that it was rethinking its product strategy — you know, the one where it spams the market with a lot of devices — and would be focusing on quality and software support going forward. This new philosophy would start with its latest flagship, the Vivo XI+. And here we are, just barely in 2019 and Blu is already staying true to its word, sort of. Owners of the phone can now sign up for the Pie beta program on Blu’s site; you just need to input your name, email, phone number, model, and IMEI number. Blu is hoping that users like you can help them test out the Pie goodness to make sure that the stable release is as refined as possible. It’s a win-win scenario. Since no one here at AP has a Vivo XI+, I can’t tell you what waits beyond the initial registration page. Blu is not clear on whether this is an open or closed beta group, so it’s probably best if you jump in on this soon. There isn’t a mention on when accepted users can expect to get the update, either. A beta is a good step toward meeting an update timeline, so hopefully this program goes well. The post BLU launches Android 9 Pie beta program for the Vivo XI+ appeared first on GuaripeteMagazine. |
| Whoops: Sony blocking Kodi on its Android TVs was an accident Posted: 10 Jan 2019 12:04 PM PST
Around half a week ago we reported that Sony appeared to be blocking the installation of Kodi — the occasionally maligned media-streaming platform — on some of its recent Android TVs. While there is an effective block in place, we’re told by Sony that it was an accident, and the next software update for affected platforms will deliver a fix. Sony reached out to us with the following comment:
If you’re a developer (or a more extreme Android enthusiast), you can probably see how the error cropped up. For everyone else, the simple version is that Sony’s software was looking at the package name, incorrectly seeing it as a Linux kernel object (due to its *.ko package name), and refusing to install. This also explains why folks in the Kodi forum were able to work around the restriction by changing the ID at build time. The even simpler version is that this was just an unintended bug that Sony plans on fixing — though the mechanism behind this bug doesn’t instill a whole lot of confidence in Sony’s software prowess. If you’re among those affected, you might have to wait for a fix, but it should be coming. The post Whoops: Sony blocking Kodi on its Android TVs was an accident appeared first on GuaripeteMagazine. |
| And Then They Were Gone: GNOME Reverts Back to Brown for Folder Icons Posted: 10 Jan 2019 12:04 PM PST Development is a perpetual, constantly changing and iterative landscape upon which changes can evaporate as fast as they made form. Case in point this week? A shocking design u-turn — said in jest, lest you panic — by GNOME designers, who've reverted back to brown folder icons in the promising new flat icon set it plans to debut in GNOME 3.32. Yes, the spiffy blue folders that, to my eyes at least, were a kindly-on-the-eye improvement over the beige directories that went before, are gone. It's like they were never there…
…But mostly because they weren't. GNOME 3.32 isn't due to land until mid-March, and the grand icon redesign itself has only been underway for around 6 months. It's development: things can change and, going forward, will continue to change on a daily basis. Bringing back the brownGNOME design team member Jakub Steiner's commit to the Adwaita icon set on Gitlab switches the full roster of pale blue folders for common free desktop directories back to light brown. No reason is (yet) given for the revision, though a related commit to Adwaita's CSS references a "match HIG". As with most design-related matters, there's probably a very well-reasoned reasonable reason behind it. Conspiracy theorist however have suggested the removal is part of a broader movement against the color blue, stemming from the "Night Light advocate lobby"¹. ManilaNow, GNOME isn't alone in shipping 'neutral' coloured folder icons. The release of elementary OS 5.0 late last year debuted 'manila' folder icons (again replacing blue ones) throughout the system. The idea is that a more neutral colour provides less distraction for the eye, allowing more thoughtful use of colour elsewhere in the system UI/UX. But don't tell the designers of Suru that though, aye? I like the funky orange… ¹Fake news
The post And Then They Were Gone: GNOME Reverts Back to Brown for Folder Icons appeared first on GuaripeteMagazine. |
| Help Pick a New Logo for Fedora Posted: 10 Jan 2019 12:04 PM PST  'f' is for 'familiar' The Fedora "Infinity" logo has been a staple part of the Linux landscape for as long as I've been using it — but that could be about to change. Fedora plans to update its famous logo and word mark with a fresher, more modern version that's easier for designers to work with. To help decide, the distro is asking the wider Linux community for its feedback on "two different directions" they've come up with. Both design proposals maintain brand recognition, but both also put a new, modern twist on an old, familiar classic. Fedora Logo Redesign
The current Fedora logo is up there with Linux penguin (Tux), the SUSE chameleon, and the eminently recognisable Ubuntu circle of friends. That's that this degree of familiarity is unexpected: the 'infinity' logo and Fedora word mark has been much the same since 2005. But longevity is not a sign of perfection. Red Hat's Mairin Duffy, a member of the Fedora design team, details the compelling technical impetus for implementing a brand update sooner rather than later. Touching on a number of 'technical reasons', she's clear that the overhaul isn't being done "for change's sake" alone but to improve Fedora, its brand communication, and its ecosystem of products and services. Amongst issues with the incumbent logo:
After several months of discussion, iteration, and exploration two design proposals have been put forward, both of which you can see embedded below. Neither mockup strays far from the logo most of us are familiar with (this is intentional) with emphasis on the 'f' retained:
The first redesign proposal sticks fairly closely to the current design, even keeping the speech bubble, but irons out some of the aforementioned niggles. The second proposal represents a more dramatic change. It uses a new-look 'infinity' icon (sans bubble) that is top loop heavy but with improved contrast on darker backgrounds. Which do you prefer?For the full ins and outs on the proposals, the history of the Fedora logo, and the reasons why an update is necessary, fling yourself on over to Mairin Duffy's blog. You can leave helpful, constructive and civil feedback on the proposals on Mairin's blog as per her invitation or, if you're feeling particularly brave, on the design bug ticket itself, linked below. The Fedora logo refresh design bug ticket Is there a Linux distro you think needs a new logo? The post Help Pick a New Logo for Fedora appeared first on GuaripeteMagazine. |


| You are subscribed to email updates from Software Trending News. To stop receiving these emails, you may unsubscribe now. | Email delivery powered by Google |
| Google, 1600 Amphitheatre Parkway, Mountain View, CA 94043, United States | |
No comments:
Post a Comment